> ## Documentation Index
> Fetch the complete documentation index at: https://docs.gcore.com/llms.txt
> Use this file to discover all available pages before exploring further.
# Configure OctoDNS with Gcore Managed DNS
OctoDNS is an open-source tool that manages DNS zones across multiple providers — use it to synchronize records from a primary DNS provider to Gcore Managed DNS, keeping Gcore as a secondary DNS with an up-to-date copy of zone data.
Before starting, verify that the primary DNS provider is supported by checking the [providers table](https://github.com/octodns/octodns#providers). If the provider is not listed, automatic record transfer is not supported.
## Install OctoDNS
Steps 2–11 run in a terminal on the machine where OctoDNS will be installed — a local laptop or any Linux server works. The commands below are for Debian/Ubuntu; for other operating systems, install Python 3 and create a virtual environment using the method appropriate for that system.
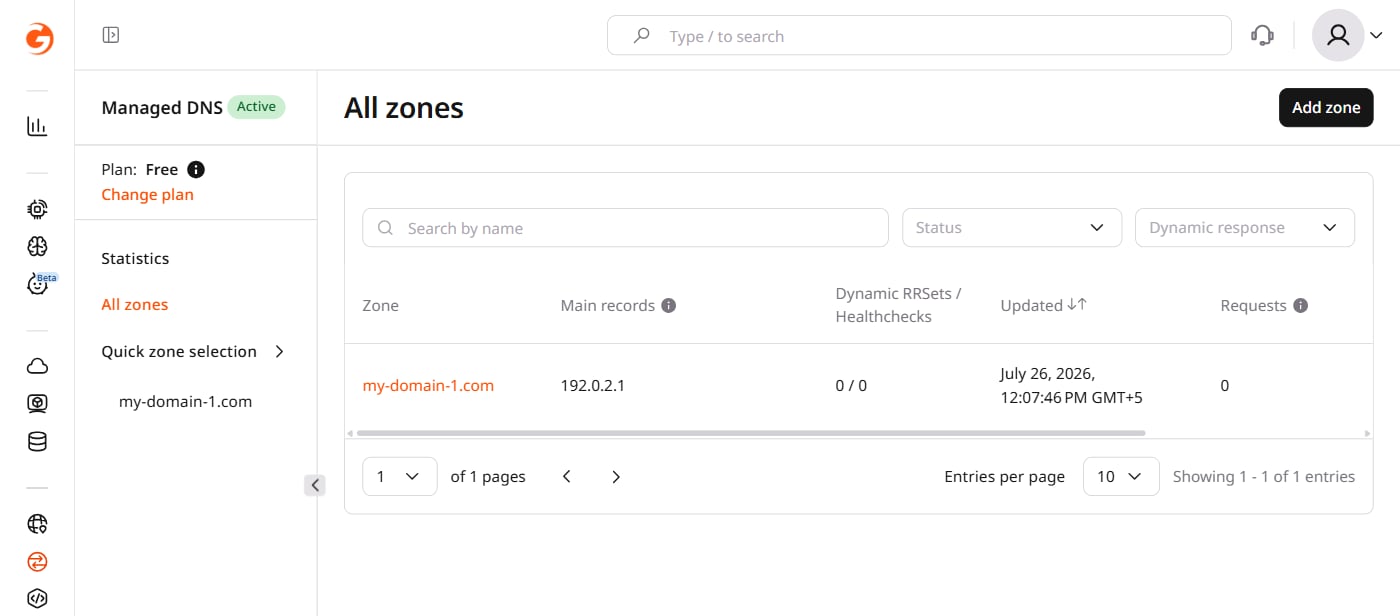
In the [Gcore Customer Portal](https://portal.gcore.com), navigate to **DNS** and create a [DNS zone](/dns/manage-a-dns-zone) for the domain to synchronize. If the zone already exists, skip this step.
 ```sh theme={null}
sudo apt update
```
```sh theme={null}
sudo apt install python3 python3-venv
```
```sh theme={null}
mkdir ~/octodns ~/octodns/config
```
```sh theme={null}
cd ~/octodns
```
```sh theme={null}
python3 -m venv venv
source venv/bin/activate
```
Keep the virtual environment active for all remaining steps.
```sh theme={null}
sudo apt-get install git-all
```
Replace `octodns_yourprovider` with the module name for the primary DNS provider found in the providers table:
```sh theme={null}
pip install octodns octodns_gcore octodns_yourprovider
```
Verify the installation:
```sh theme={null}
octodns-sync --version
```
Expected output (version number varies):
```
octoDNS x.x.x
```
If the command is not found, the virtual environment is not active. Run `source venv/bin/activate` from the `~/octodns` directory and retry.
```sh theme={null}
cd ~/octodns/config
```
This file specifies the providers and DNS zones for OctoDNS to manage. YAML indentation is required — use the template below as a starting point:
```yaml theme={null}
providers:
[your provider name]:
[your provider class]
[authentication data]
gcore:
class: octodns_gcore.GCoreProvider
[authentication data]
zones:
[your DNS zone].:
sources:
- [your provider name]
targets:
- gcore
```
**Gcore DNS provider configuration**
The Gcore DNS provider requires authentication. An [API token](/account-settings/api-tokens) is recommended:
```yaml theme={null}
gcore:
class: octodns_gcore.GCoreProvider
token: YOUR_API_TOKEN
token_type: APIKey
```
Alternatively, login and password authentication is supported:
```yaml theme={null}
gcore:
class: octodns_gcore.GCoreProvider
login: your_login
password: your_password
```
**Primary provider configuration**
Each provider has its own configuration format. In the providers table, find the primary provider, open its repository, and locate the **Configuration** section to copy the provider name, class name, and authentication fields.
With Amazon Route 53 as the primary provider, the full `config.yaml` looks like this:
```yaml theme={null}
providers:
route53:
class: octodns_route53.Route53Provider
access_key_id: YOUR_KEY_ID
secret_access_key: YOUR_SECRET_KEY
gcore:
class: octodns_gcore.GCoreProvider
token: YOUR_API_TOKEN
token_type: APIKey
zones:
myzone.com.:
sources:
- route53
targets:
- gcore
mymyzone.com.:
sources:
- route53
targets:
- gcore
```
Save and close the file.
A dry-run shows the planned changes without applying them:
```sh theme={null}
octodns-sync --config-file=~/octodns/config/config.yaml
```
Example output:
```
* gcore (GCoreProvider)
* Create (route53)
* Summary: Creates=1, Updates=0, Deletes=0, Existing=0, Meta=False
```
If the output is correct, apply the changes:
```sh theme={null}
octodns-sync --config-file=~/octodns/config/config.yaml --doit
```
Example output:
```
INFO GCoreProvider[gcore] apply: making 1 changes to myzone.com.
INFO GCoreProvider[gcore] creating: Create (route53)
INFO Manager sync: 1 total changes
```
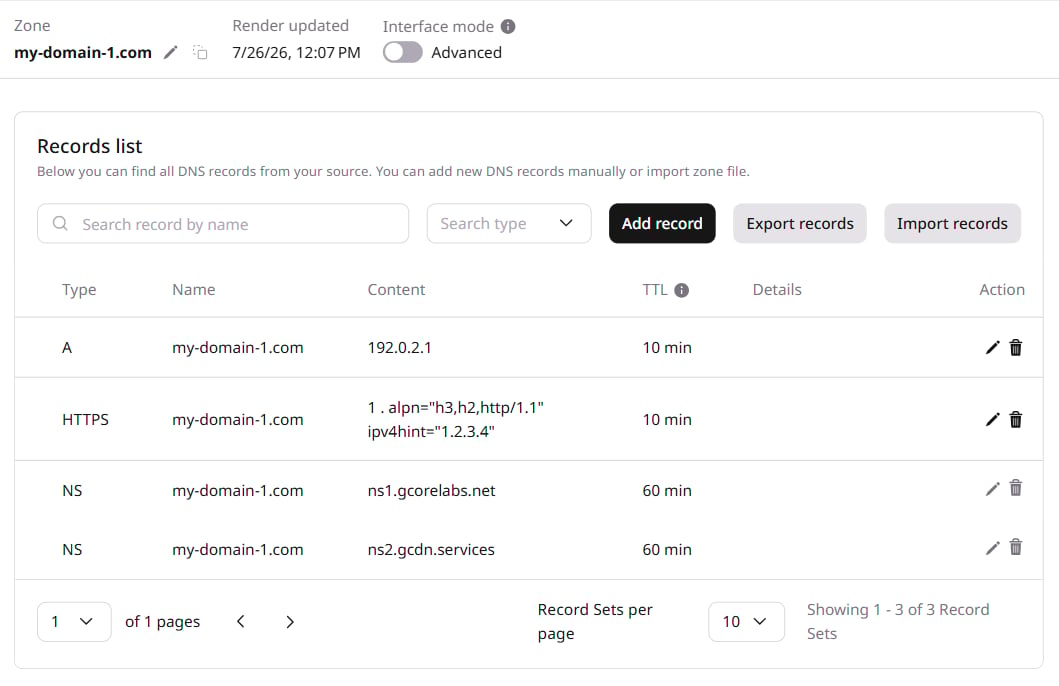
The synchronized records are visible in the Customer Portal under **DNS** → the zone name.
```sh theme={null}
sudo apt update
```
```sh theme={null}
sudo apt install python3 python3-venv
```
```sh theme={null}
mkdir ~/octodns ~/octodns/config
```
```sh theme={null}
cd ~/octodns
```
```sh theme={null}
python3 -m venv venv
source venv/bin/activate
```
Keep the virtual environment active for all remaining steps.
```sh theme={null}
sudo apt-get install git-all
```
Replace `octodns_yourprovider` with the module name for the primary DNS provider found in the providers table:
```sh theme={null}
pip install octodns octodns_gcore octodns_yourprovider
```
Verify the installation:
```sh theme={null}
octodns-sync --version
```
Expected output (version number varies):
```
octoDNS x.x.x
```
If the command is not found, the virtual environment is not active. Run `source venv/bin/activate` from the `~/octodns` directory and retry.
```sh theme={null}
cd ~/octodns/config
```
This file specifies the providers and DNS zones for OctoDNS to manage. YAML indentation is required — use the template below as a starting point:
```yaml theme={null}
providers:
[your provider name]:
[your provider class]
[authentication data]
gcore:
class: octodns_gcore.GCoreProvider
[authentication data]
zones:
[your DNS zone].:
sources:
- [your provider name]
targets:
- gcore
```
**Gcore DNS provider configuration**
The Gcore DNS provider requires authentication. An [API token](/account-settings/api-tokens) is recommended:
```yaml theme={null}
gcore:
class: octodns_gcore.GCoreProvider
token: YOUR_API_TOKEN
token_type: APIKey
```
Alternatively, login and password authentication is supported:
```yaml theme={null}
gcore:
class: octodns_gcore.GCoreProvider
login: your_login
password: your_password
```
**Primary provider configuration**
Each provider has its own configuration format. In the providers table, find the primary provider, open its repository, and locate the **Configuration** section to copy the provider name, class name, and authentication fields.
With Amazon Route 53 as the primary provider, the full `config.yaml` looks like this:
```yaml theme={null}
providers:
route53:
class: octodns_route53.Route53Provider
access_key_id: YOUR_KEY_ID
secret_access_key: YOUR_SECRET_KEY
gcore:
class: octodns_gcore.GCoreProvider
token: YOUR_API_TOKEN
token_type: APIKey
zones:
myzone.com.:
sources:
- route53
targets:
- gcore
mymyzone.com.:
sources:
- route53
targets:
- gcore
```
Save and close the file.
A dry-run shows the planned changes without applying them:
```sh theme={null}
octodns-sync --config-file=~/octodns/config/config.yaml
```
Example output:
```
* gcore (GCoreProvider)
* Create (route53)
* Summary: Creates=1, Updates=0, Deletes=0, Existing=0, Meta=False
```
If the output is correct, apply the changes:
```sh theme={null}
octodns-sync --config-file=~/octodns/config/config.yaml --doit
```
Example output:
```
INFO GCoreProvider[gcore] apply: making 1 changes to myzone.com.
INFO GCoreProvider[gcore] creating: Create (route53)
INFO Manager sync: 1 total changes
```
The synchronized records are visible in the Customer Portal under **DNS** → the zone name.
 ## Update records
To re-sync records after changes in the primary provider:
```sh theme={null}
cd ~/octodns
source venv/bin/activate
```
```sh theme={null}
octodns-sync --config-file=~/octodns/config/config.yaml --doit
```
To automate record updates, schedule this command with cron.
## Update records
To re-sync records after changes in the primary provider:
```sh theme={null}
cd ~/octodns
source venv/bin/activate
```
```sh theme={null}
octodns-sync --config-file=~/octodns/config/config.yaml --doit
```
To automate record updates, schedule this command with cron.